Getting Started
Account Settings
Registering
You can log into Cuelist here.
If this is your first time visiting the site you will need to register. At the bottom of the sign-in form you will see Don’t have an account? followed by a Create Account button. If you have a Google account and want to use that to sign in, you only need to click Continue with Google under the Register with Google heading and follow the quick prompts.
If you would rather register with your email address, the form asks for your first name, last name, email address, and a password, which you enter twice. Your password needs at least eight characters and must include an uppercase letter, a lowercase letter, a number, and a special character. The form checks each of those off as you type, so you can see what is still missing. When everything is filled in, click Create Account.
If you register with your email address you will need to take the additional step of validating your email address before you can log in. Once you do that, or if you used a Google account, you are ready to sign in.
Please note
After logging in, the first page you will land on will be this dashboard. This is the place you will find all of your existing projects as well as any invitations to new projects you might have. You can return to this dashboard by clicking All Projects in the menu anytime.
If you are using a free account, you will see a sample project and an Upgrade Account button in the upper right-hand corner of the dashboard. Free accounts, also called “Observer” accounts, allow you read-only access to existing projects in which you have been invited. Those projects will all appear in the Pending Project Invites box at the right of the dashboard. You cannot create new projects with an Observer account.
The Sample Project in your dashboard provides you with an opportunity to explore what the paid account experience is like. With the exception of inviting collaborators and adding, replacing, or deleting pages of the project, you will have full access to all the functions of a Cuelist paid “Collaborator” account.
If you want to upgrade your account, click on the Upgrade button and follow the prompts to choose your account settings. All subscription accounts will receive a 15-day free trial, so you will have plenty of time to test out the features of Cuelist before your credit card is charged.
You can access the dashboard by clicking on All Projects in the menu. If you have upgraded your account you will now have two options to begin work on a project: you can either start a new project or accept an invitation for an existing project.
Billing and Unsubscribing
Anytime you need to make any changes to your account or billing settings, head to the Account Settings page via the menu button in the upper left-hand side of the navigation bar. The page has two tabs, My Profile and User Sessions. My Profile is where your account lives.
On the left you will find your profile card: your photo, your name and email address, and a badge showing your account type. If you are part of an institution, that card names it below. On the right is the Subscription card, which names your current plan and carries the buttons that apply to it. A current subscriber sees Manage Plan. An institution administrator sees Manage Plan and Manage Active Users. Below both, a full-width card shows whether your account is connected to The Notes List.
If you are not a current subscriber, the Subscription card shows Observer with an Upgrade Account button instead, which will let you create the subscription that best fits your needs. If you have questions about additional Educational or Institutional subscription options that are not listed, please contact us at info@thecuelist.com.
If you registered with an email address, the Account Settings page lets you change your account photo and your password. If you signed in using Google, your name, email address, and photo come from that account, so the card says so and offers a Manage in Google link rather than fields to edit.
Your invoices and billing history live one level in. Click Manage Plan, and on the card for your current plan you will find a Manage Billing button, which opens your invoices and billing history.
You can cancel your subscription at any time from the same window. Manage Plan opens Switch your subscription plan, which names your current plan, shows the plans you could move to, and carries a Cancel subscription link at the bottom right. Clicking it asks you to confirm and tells you the exact date your access ends. You can back out with Keep my plan.
Once you confirm, you will no longer be billed. Your account stays fully active until the end of your current billing period, then reverts to an Observer, read-only account. Your projects are not deleted, and you can resubscribe at any point to regain edit access. If you are on a dual Cuelist and Notes List plan, cancelling ends both, including Show Sync.
Education / Institutional Accounts
Educational and institutional accounts come with at least five active licenses. One primary user will be considered the administrator of each educational account (typically the person who signs up for the educational subscription). The four (or more) other licenses can be moved from user to user. The administrator will be able to assign and reassign the four (or more) additional active licenses to affiliated users at any point. So, if students or staff are working on a project, they can be assigned an active license, and then when that project is finished and your program moves to another project, the administrator can reassign the license to another individual.
Every student and staff member retains read-only access to every project on which they work, whether or not they are an active user. So, former users can always reference old projects or save them as PDFs just by logging into their account.
To get started, go to the Account Settings menu and click on the Manage Active Users button at the top of the page. This will open up a pop-up menu. At the top of that menu, you will see a text field asking for the name of your institution. This is how other users will find you, so make sure there is a name that is clear and easy to find.
There are two ways to bring people in. The quickest is to invite them: under Invite a user to affiliate, enter their email address, optionally their name, and click Send Invite.
An invited user takes one of your licenses automatically as soon as they accept, so there is nothing further for you to do. If every license is already in use when they accept, they will be affiliated with you but left inactive until you free one up.
They can also come to you. Have them create a free account, then go to their own Account Settings page and click Add Affiliation on their Subscription card, where they can find your institution by the name you entered. Someone who affiliates this way is not given a license automatically, so you still activate them yourself in the step below. That is deliberate: it lets you vet anyone who finds you on their own.
Once someone has affiliated with you, you can give them one of your licenses. Open Manage Active Users again and you will see a numbered slot for each license you hold. Each slot is a drop-down reading Open License until you choose a name for it. Names only appear once that person has affiliated with your institution, so if you cannot find someone, ask them to check that they have. When you have made your choices, click Confirm Changes.
If you need more licenses than you hold, click Adjust Total Licenses at the bottom of the same window. Additional users are $34.99 per user per year, or $59.99 on a dual Cuelist and Notes List plan. Cuelist will charge the credit card on file once you confirm, prorated against the time remaining on your current subscription.
If you choose to let your subscription lapse, all users that you have activated will also be deactivated. Any user is free to reactivate their account individually and all projects they worked on under your subscription will remain with them.
Show Pass
A Show Pass is a one-time purchase that unlocks a single production for your whole team. Everyone you invite can edit it, whatever their own subscription status, and nobody you bring in has to pay anything to join the project.
It is a different shape from a subscription. A subscription covers you, across every project you work on. A Show Pass covers one production, for everyone working on it.
Buying a pass
Open your Account Settings page and click Buy a Show Pass on the Show Pass card.
A pass is a one-time purchase that works independently from any subscription you might have. You do not need to have a subscription to use one, and any subscription you do have will not be affected by the purchase.
A pass does not expire, so you can buy one now and use it whenever the production actually starts. If you buy more than one, they wait on your account until you use them.
Starting the production
A pass is not attached to anything until you use it. When you are ready, go to your dashboard and click Activate Show Pass, then create the project the way you normally would. That project becomes the one the pass covers.
Choose deliberately, because a pass is used up the moment you start the project and cannot be moved to a different one afterwards. If you delete the project, you will lose access to the associated pass.
Duplicating a Show Pass production gives you an ordinary project, not a second pass. The copy brings your script, cues and notes across, but it is not unlocked, so it follows the same rules as any other project you own. If you do not have a subscription, you will be able to open the copy but not edit it until you subscribe.
Inviting your team
Invite collaborators exactly as you would on any other project. Everyone you add automatically gets edit access. They do not need a subscription, they are not charged, and there is no limit on how many people you bring in.
A pass lifts the subscription requirement and nothing else. Layer permissions and roles work exactly as they do on any other project, so the owner or an administrator still decides which layers each person can edit.
The pass covers that one production. If someone wants to work on their own projects outside it, they will need their own subscription.
New Projects
Creating Projects
To start a new project, click the Start a New Project button in the upper right-hand corner of the dashboard. You will be asked to name your project and upload a PDF script.
Once you have created your project, you will be returned to the dashboard and will notice the project is now available for editing. Click anywhere on the project to begin editing your script. Each project also carries a pin in its upper left-hand corner, which holds that project at the front of your dashboard no matter how the rest are sorted, and a menu in its upper right-hand corner containing Duplicate and Delete. Please remember that as a project creator, you alone have the power to permanently delete the project for all of your collaborators. If you are working on a project with multiple collaborators, we highly recommend you don’t use this option until checking with them first. You are not charged for storage, so if you are working with multiple users, in most cases, it is in your best interest to just leave the project in your dashboard rather than delete their work as well as your own.
Beyond creating your own project, the other alternative is to be invited to a project by another collaborator. As soon as you are invited to the project, it will show up in your Pending Project Invite box. From here, you can either accept the invitation or decline. If you decline the project, it will immediately disappear from your Pending Project Invites. If you do that in error, simply request a new invite from your collaborator and start the process again.
If you accept the project, it will immediately be moved into your dashboard. You will notice a few differences on accepted projects in which you are not the creator. The first and most obvious one is that you are not able to delete the project. If you no longer want to have the project in your dashboard, simply enter the project and remove yourself as a collaborator. Otherwise, the project will remain in your dashboard as long as it is in existence.
As you accumulate projects, the dashboard gives you several ways to find your way around them. Across the top you will see My Projects, Shared with Me, and All Projects. My Projects holds the ones you created, Shared with Me holds the ones you have been invited to, and All Projects shows everything together. Shared with Me only appears once somebody has actually shared a project with you.
You can also change how those projects are displayed. The View control switches between thumbnail view, where each project appears as a card, and list view, where they appear as rows. Until you change anything, projects are ordered by date with your most recently updated one first.
Both views offer the same sorting, in different places. In thumbnail view, use the Sort menu to order your projects by date or by name. In list view, click the Name or Last Updated heading at the top of the column instead, and click the same heading again to reverse the order. Whichever way you sort carries over when you switch views, and Cuelist remembers which view you were last using.
If a project is connected to The Notes List, its card carries a small Show Sync marker. Teal means the sync is working normally; red means the last sync did not complete. Only the project owner can connect or disconnect a project, but every collaborator can see the marker.
Modifying Projects
Once you have created a project, you can modify some key features in the Project Settings menu in the upper left-hand corner of the navigation bar. As the project owner, you can rename the project at any point.
The project owner can also add a project image to be associated with any project on the user dashboard. That image can be a JPG, GIF, or PNG image no larger than 1MB. For best results, we suggest uploading a square image.
Each user can set the default cue placement on the left or right side of the page. This choice will affect the initial placement of cues in any newly formed layers. In addition, every cue can also be adjusted individually. Whatever you choose, please note that this choice only affects the individual user’s display, and the default position can be changed at any point.
If you are the project owner, at the bottom of the Project Settings menu, you will also see a Duplicate Settings section. Duplication allows you to create a copy of any project and gives you full ownership over every layer in the duplicate copy. This copy will include all annotations, bookmarks, and work notes. It will not duplicate your collaborators, so you will have sole ownership over the duplicate copy. Changes to the duplicate copy will not affect the original. The project owner can duplicate their projects at any time. At the top of the Duplicate Settings section, there is a toggle switch which will lock the project and prevent any other users from duplicating it. If this switch is in the unlocked setting, then all active collaborators will be able to make their own copies. All projects will default to the locked setting when created. You can read more about this feature in the Special Features section of the user guide.
Project Lock
If you are the project owner, you will also see a toggle switch near the top of the project menu called Project Lock. Flipping this switch will lock the project and prevent changes for all users. This lock only locks the current version of the script, so please see History in Special Features to understand how this function can be helpful in different circumstances.
Layers
Creating Layers
To create layers, go to the menu and click Layers. You can title your layer, pick a color, and then click the Add Layer button.
Cuelist functions best if collaborators have access to a layer specific to their field. Examples of layers might be Sound, Lights, Automation, Projection, Cue Lights, etc.
Once the layers are created, new options appear. If you click the expand arrow next to your layer, you will see the option to Hide Cues, Hide Notes, Change Color, Edit Cue Properties, Edit Note Properties, and Delete the Layer.
If you want to rename the layer, just click on the current name and make the change. The option to change color functions similarly. Just open up the color menu and pick your color. The layer will change for everyone immediately.
Hide Cues will hide all cue information in that layer. Hide Notes will keep the cues visible but will hide all other annotations. You will notice that when you click on Hide Cues an icon will appear in the colored box associated with that layer.
Editing Cue Properties and Attributes
Here, you can choose your default cue placement, default cue size, default resizable box opacity, default cue line opacity, and the attributes listed within each cue. These choices only affect your personal account, so you don’t have to worry that you will alter any other user’s display with the choices you make.
Default cue placement allows you to initially have the cue title box appear on the right or left side of the page. This is a choice you can make on a layer-by-layer basis, so it is possible to have one layer place cues on the left and one on the right. Cue title box position can also be controlled on an individual cue-by-cue basis by untethering the cue. We will go over how to do that in Cues, under Annotations.
You can also view your cues off the PDF page in the right or left margin. To view cues this way, you must be in the single-page layout view and toggle the Margin View switch (found on the right side of the navigation bar) to the ON setting. Please see Cues in Annotations for more information.
Cue size relates to the size of the cue title box. This can be changed on a cue-by-cue basis inside the individual cue menu.
The resizable box opacity adjustment will change the opacity of the color inside your box. A low level will serve as a colored highlight, while a high level will black out whatever is inside the box.
Cue line opacity allows users to make the lines connecting the cue marker and the cue title more or less present layer-by-layer. You might not want the lines visible for some layers but quite bold for others.
This menu is also where you switch on Auto Numbering for a layer, so cues are numbered for you as you place them. See Auto Numbering under Cues for how it works.
Attributes give you the ability to select exactly what information you want to place in each cue. You can add space for a description, notes, time, etc. The layer attributes can generally be divided into three categories: lighting, sound, and props. You can select all the attributes in a single category or pick and choose to your liking. If you leave an attribute unchecked then you won’t see a space for that item inside the cues in that layer. The attributes you display are unique to your account only and won’t alter any other user’s display.
At the bottom of this menu, you will see four User Defined Attributes per layer. You can title these and add them as you see fit.
You can also determine what appears on the face of the cues in each layer. The Visible in cue section offers four choices: Layer Name, Number/Title, Label, and Time. Tick as many as you find useful, with one rule: a cue must always show either the Number/Title or the Label, so you cannot switch both off. If you uncheck the one that is still on, Cuelist will turn Number/Title back on for you. Ticking Time here also switches on the Time attribute inside the cue, so there is somewhere for that time to come from. You can make the same choice on a cue-by-cue basis inside the individual cue menu.
Editing Note Properties
These options will set the default for every note you create in the layer. From here, you can choose your default font, font size, line thickness, and stamp size. You can also choose the primary, secondary, and highlight colors. Finally, you can choose whether your text notes and stamps have a solid or transparent background. You can always alter any of these properties on a note-by-note basis by using the Modify Note menu inside the note itself.
Primary Color refers to the default color of the text in your text notes and the color of your text in your stamps when you use the stamp tool. It also refers to the color of any line created on the page. Secondary Color refers to the border of any stamp you create, and Highlight Color refers to the color of your highlight tool. For all of these colors, you have the option to associate the color directly with the corresponding layer color by clicking the “Match Layer Color” box.
Layer Organization
The final option in the layer menu is under the heading Active Layer. After you have created some layers, you will need to select an active layer. This is your default layer for the cues and text you create. Your active layer can be any visible layer for which you have edit permissions.
When you create a cue, you can change the layer directly on the cue, so picking the proper active layer is nothing more than a time-saving convenience.
You can see your current active cues and notes layer at the left side of the toolbar on the main PDF page. You can click here to select a different active layer. You do not have to have the same Cue and Note layer active simultaneously.
Selecting Delete this Layer will delete the layer and all associated cues for everyone (so, use this option wisely). You will get a warning confirmation pop-up when you have cues in the layer. However, if the layer is empty it will immediately delete.
Collaborators
Inviting Others
When you first create a project, you will be the only one who can see and edit it. If you want to invite collaborators, the process is very straightforward.
First, from inside the project, go to the menu in the upper left-hand corner and click on the Collaborators option. From here, you can invite as many collaborators as you would like. They don’t have to be current Cuelist users to receive the invite, but they will need to sign up for either a free or paid account in order to view the project.
When you expand the Invite Collaborators menu, you will see four places in which you can input information. The first line, “Find Existing User,” is optional, but if your collaborator is already a Cuelist user known to you, putting their information on this line will pre-populate both their email and name. The final line is for their role. This should be filled out with the position your collaborator will undertake on your project. For example, Lighting Designer, Sound Designer, ASM, etc.
Once you finish filling out the form, click Send Invite, and an email invitation will be sent to your desired collaborator. The project will also immediately come up in their Pending Project Invite box.
After you have sent the invite, your potential collaborator will be moved to a Pending Collaborators list. If you made a mistake in your invite, you can open their name with the expansion arrow and remove them from the project before they have accepted your invitation. The user will no longer see the project in their Pending Project Invite box.
Assigning Permissions
Once a collaborator has accepted your invitation, they officially become a part of the project. If you are the project owner, you can assign your new collaborator specific layers to which they will have edit access. The project owner will automatically have full access to every layer created by every user. However, all other users will only have automatic edit permission on the layers they personally create. If you need edit access to layers created by another user, you must request that the project owner or an administrator (see Assigning Roles below) assign you permission for that layer.
If you are the project owner or an administrator, you can assign layer permissions in the following way: go to the Collaborator menu and click on the expansion arrow next to a user’s name. You will see a column with the name of every layer on the right and a box in a column on the left. Simply check the box associated with a layer, and that user will now have full edit permission on that specific layer. If a user doesn’t have permission to edit a layer, they can still view it, but they won’t be able to make any changes. As a collaborator, you can see what layers you have edit permissions on by expanding your name in the Collaborators menu. Your layers will have checked boxes.
Assigning Roles
Beyond assigning permissions, as the owner you can also assign roles to your collaborators. Again, start at the Collaborators menu. Press the arrow to expand the options for any collaborator and click on the Collaborator Access option. A pop-up menu will appear. If the user has a free Observer account, you will only see the option to remove them from the project. But, if the user has a paid account, you will see the option to shift their access from Member to Administrator or Owner.
A member has the ability to add, delete, and edit cues and notes on any layer to which they are assigned access. They can also create their own layers. In addition, they can save versions in the history menu. Members can’t edit the underlying PDF in a project. Members can remove themselves from a project, but they can’t remove anyone else.
An administrator has all of the abilities of a member, plus they can assign layer permissions to themselves or other members. They can also add, replace, and delete pages in the PDF. Administrators can also turn other paid members into administrators. Finally, administrators can completely remove other members from a project. Administrators have the same access as project owners, but they cannot delete a project.
Separately from these roles, you can decide who is allowed to edit the script’s structure, meaning its acts, scenes, and songs. In the same Collaborator Access window you will find a Can edit Structure checkbox. Members do not have this permission unless you give it to them, while project owners and administrators always do. Structure is shared by everyone on the project rather than being personal to one user, which is why it is granted deliberately. You can read more about the tool itself in Structure, under Special Features.
Users can also transfer ownership of the project. There can only be one owner on any project, and only the owner can transfer ownership, so you can’t undo this change without the consent of the new owner. The owner of a project is the only one who can delete it. They will also automatically have permissions on all layers rather than having to assign permissions on a layer-by-layer basis.
PDF Page Layout
Menu Bar
The Menu Bar includes the following. Each tool is discussed throughout this guide.
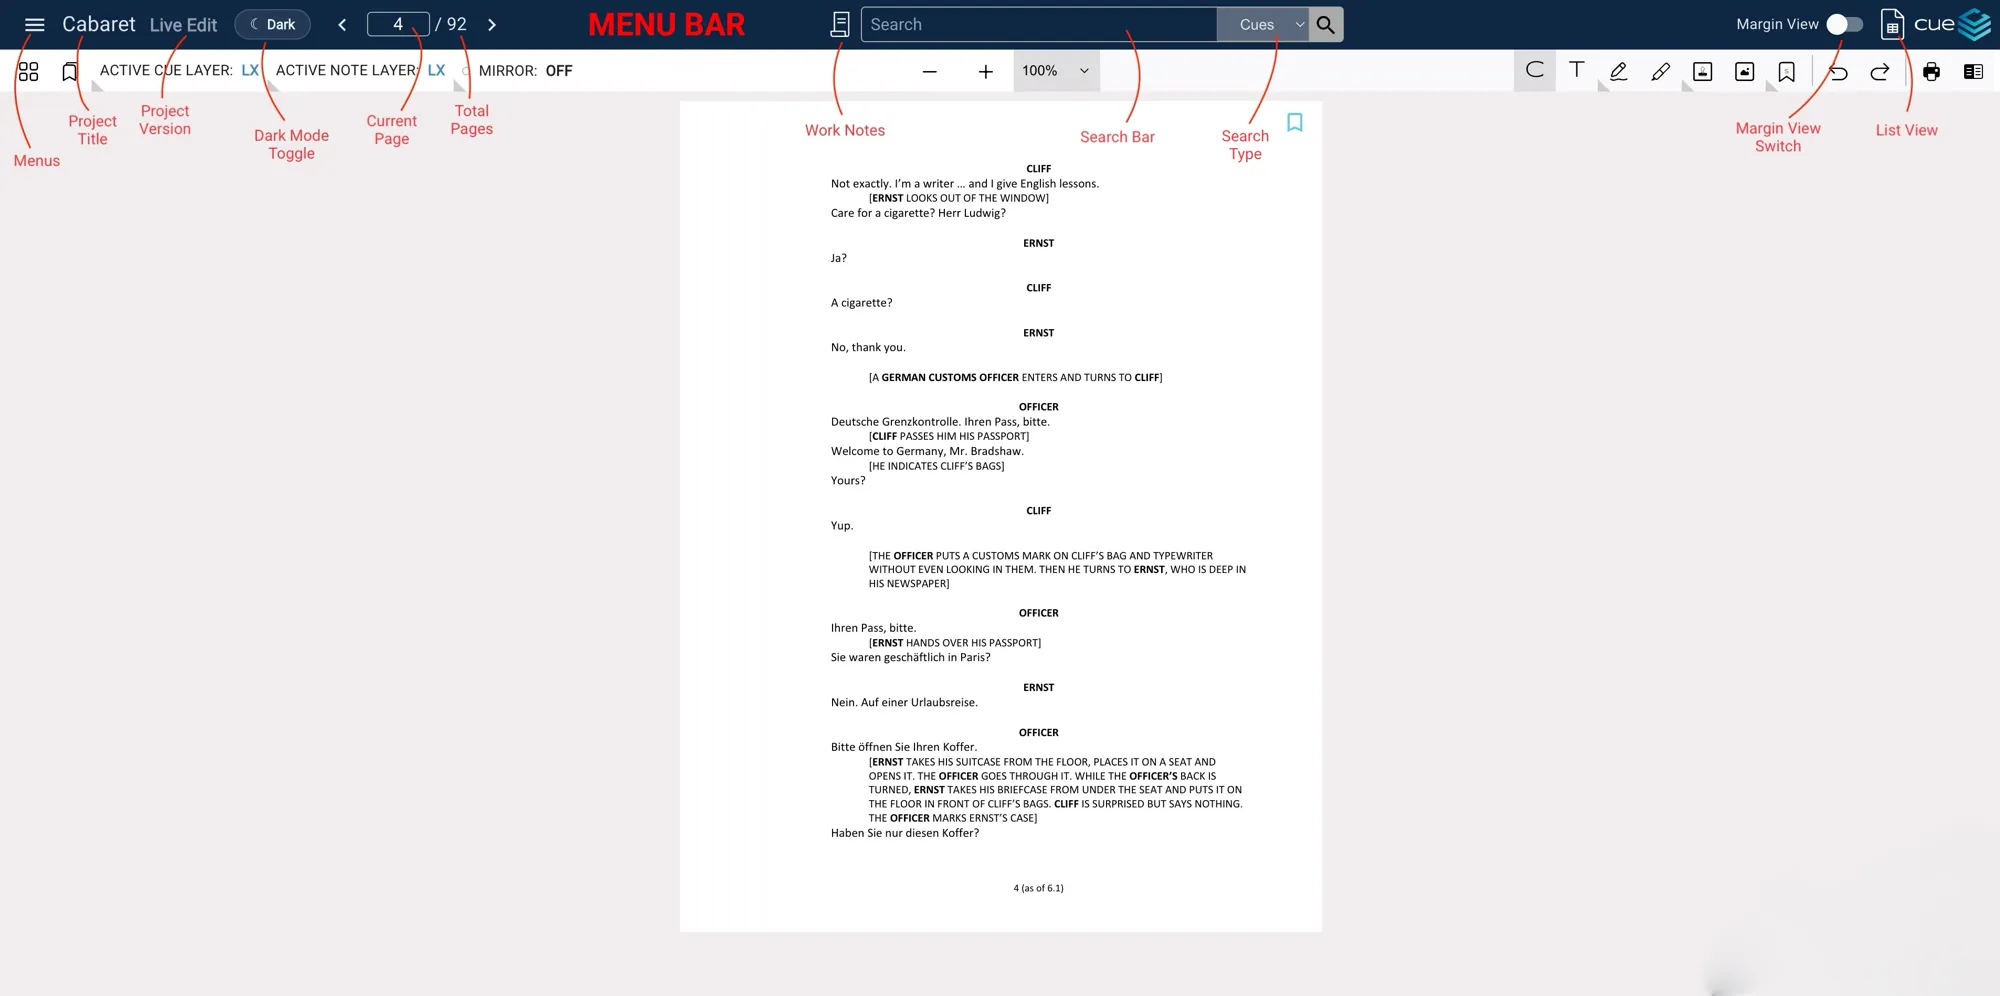
- Menus
- Project Title
- Project Version
- Dark Mode Toggle
- Current Page
- Total Pages
- Work Notes
- Search Bar
- Search Type
- Margin View Switch
- List View
Tool Bar
The Tool Bar includes the following. Each tool is discussed throughout this guide.
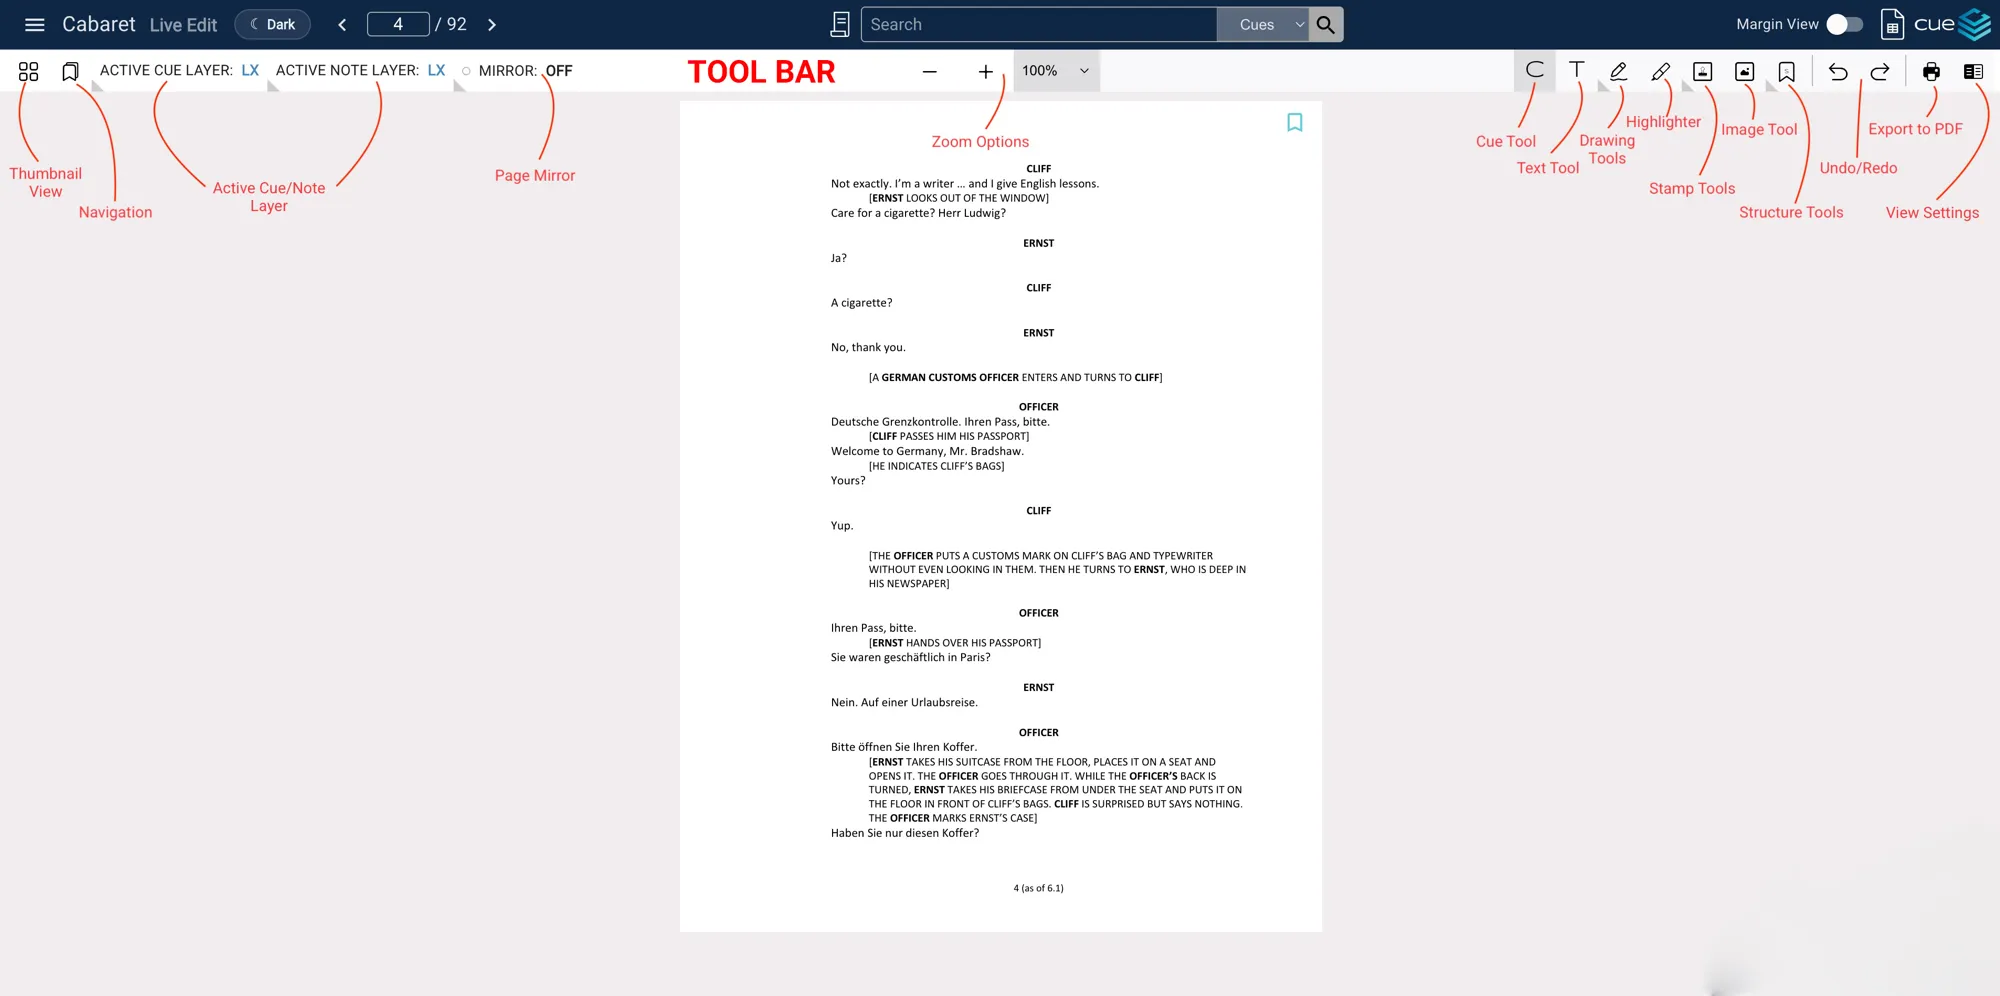
- Thumbnail View / Script View
- Navigation
- Active Cue/Note Layer
- Page Mirror
- Zoom Options
- Cue Tool
- Text Tool
- Drawing Tools
- Highlighter
- Stamp Tools
- Image Tool
- Structure Tools
- Undo/Redo
- Export to PDF
- View Settings
PDF View
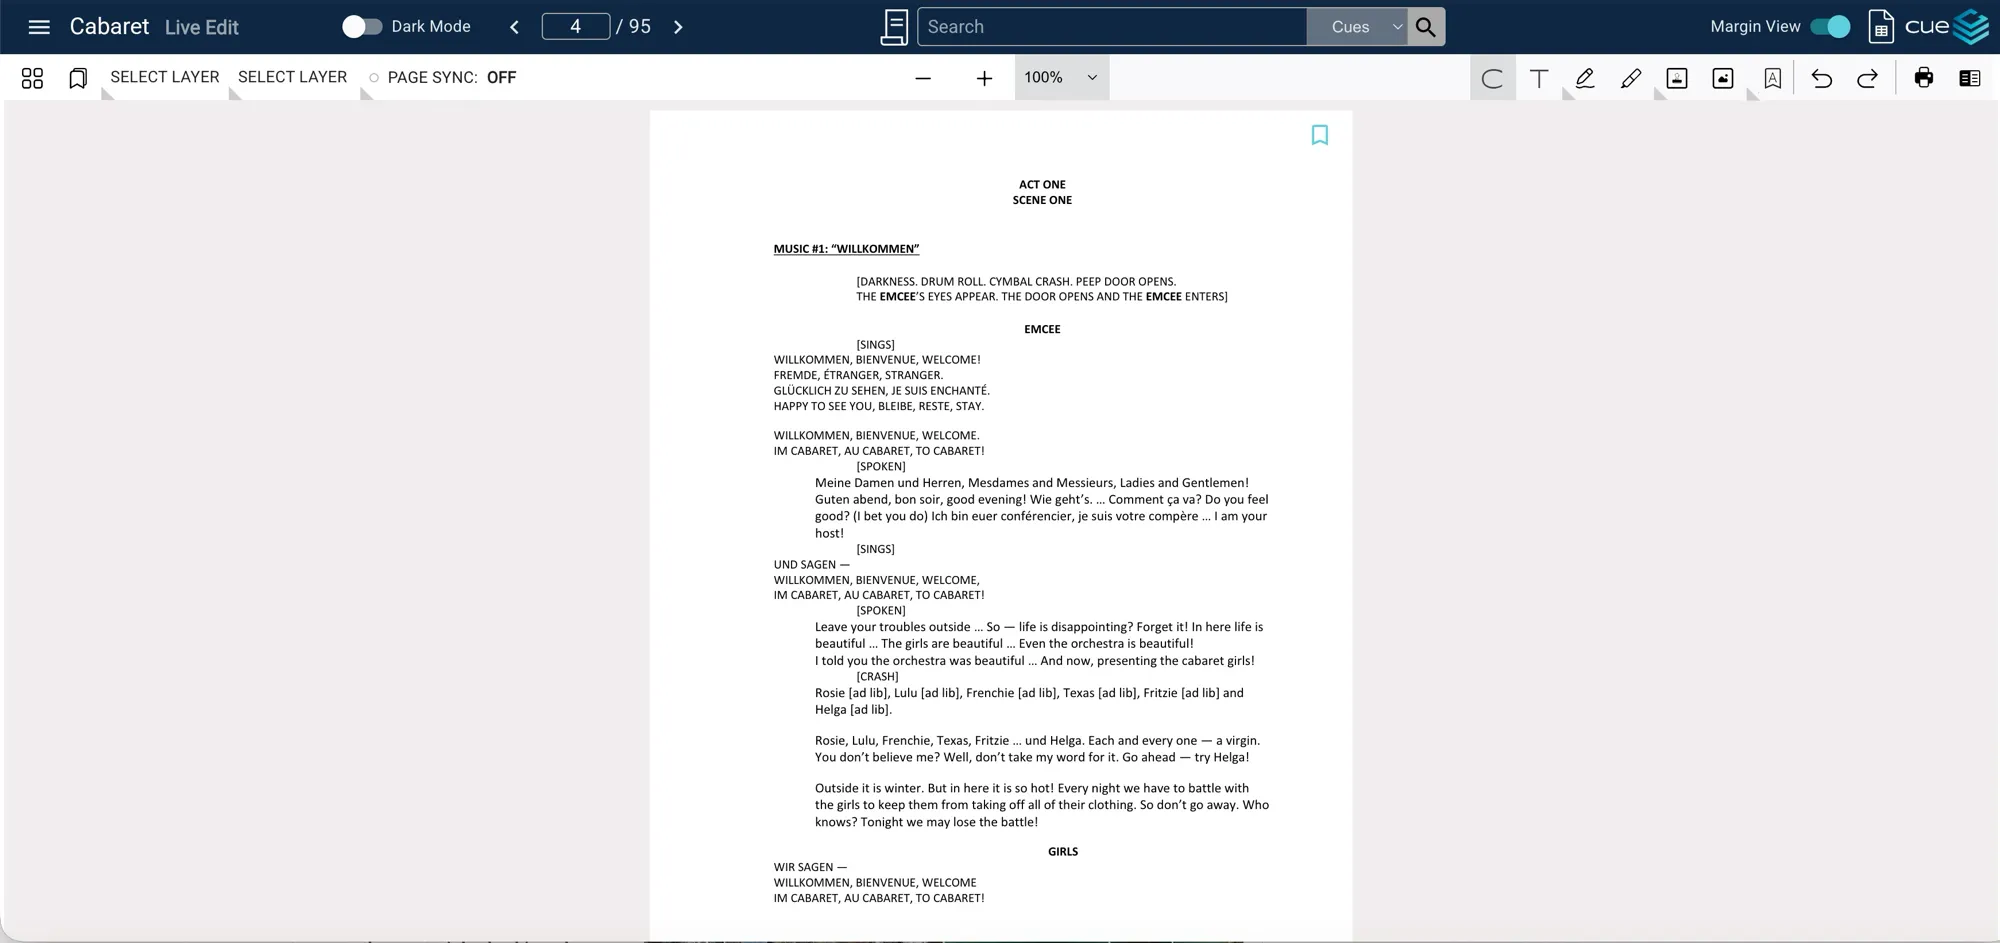
When you first open your project, you will see a single PDF page on your screen. Above the PDF, you will see a toolbar. At the center of that toolbar are your zoom tools, which will allow you to zoom in and out of your PDF view.
At the right side of the toolbar, you will see an icon called View Settings. Clicking that icon will bring up a menu that will allow you to change your PDF view from a single to a double-page view. In a double-page view, you can also choose whether the first page is even or odd numbered.
Please note